Microfrontend project example: Jewels and watches (Angular)
Notice that in this example, we are going to explain you only the relevant steps to create your Microfrontend.
For this project we are using Node (16.13.0) and Angular version (12.0.5).
STEP 1: create angular project
For this project, we are going to use the same angular version of the retailgear-app-main-v1. After properly configuring the workspace, the first step is to create an angular project with the following command:
ng new jewels-and-watches
After the project creation, we need to install all the nodes dependencies (note that we are going to use yarn but feel free to use any other package manager):
yarn install
Run the project with ng serve.
STEP 2: create angular component and design styling
In this project, we want to show a list of certificates, so for that we have to create a certificate module using this command:
ng generate module certificate --route certificate --module app.module
We have to install the following dependencies, since we need those in our project:
- bootstrap@5.1.3 (use same bootstrap version of the main app)
- free-solid-svg-icons@6.1.1
- ngx-translate/core@14.0.0 - for the translation
- ngx-pagination@5.1.1 - for pagination functionality
- ckeditor4-angular - supported angular version >= 5, for the text editor.
You can add those dependencies with the following command:
yarn add [DEPENDENCY_NAME]
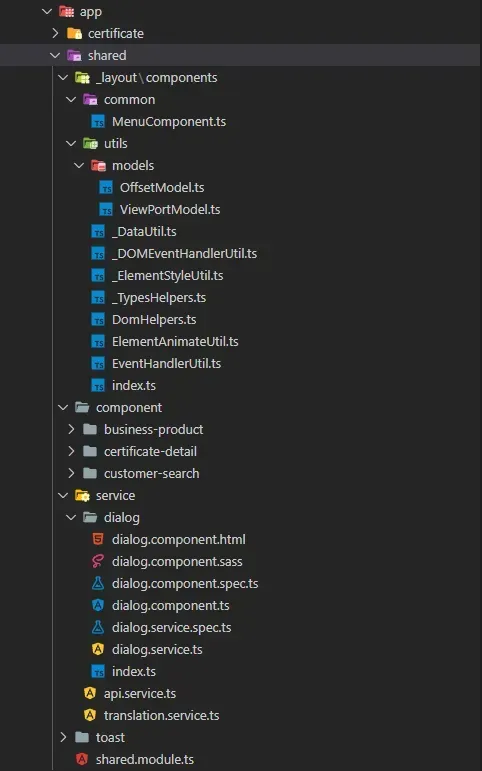
Then we have to implement the global classes for the styling, which we declare according to the project theme (dark or light theme). After the styling process, we have to create a module, called shared.
ng generate module shared
This module will contain all the common services like: API service , toast service, etc… so we can access them throughout the whole application.
You can copy those folders and files from the retailgear-app-main-v1
shared folder, be sure to copy the MenuComponent file.
Note that within our project, we are going to use the translation module declared in the retail gear-app-main-v1. Even if that module will be shared by our HOST (retail gear-app-main-v1) within the shared property (read: How to integrate your microfrontends), we still need to add it in our microfrontend project.
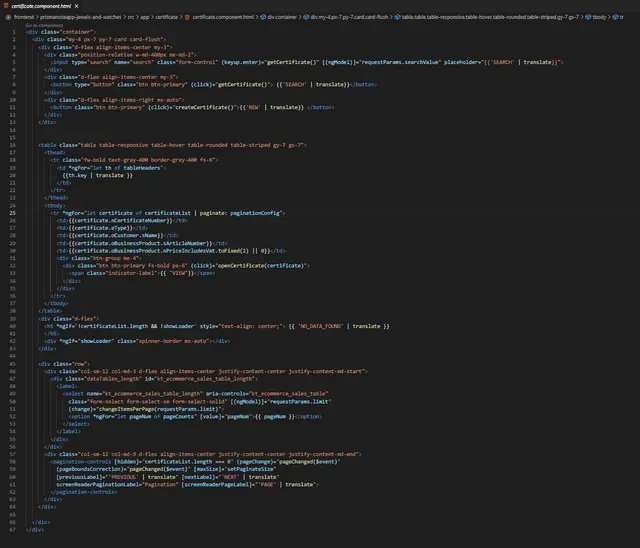
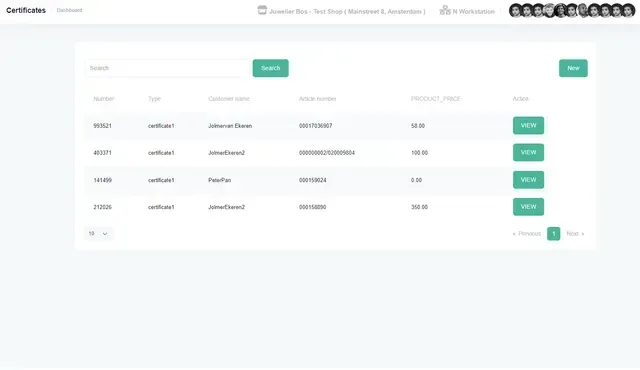
Next we have to start working on the layout/design part of the certificate list module, we implement inside it all the needed functionality like searching, sorting, and pagination.
We also need to provide functionality to create a certificate so for that we have to add another component inside the service folder of the shared module, the dialog service.
You can copy that component from the following path in your main application folder ...\business\dialogs\custom-dialog, so copy that folder, rename it dialog and fix possible issues.
Then we have to create another component within the component folder of the shared module folder, the certificate-detail component.
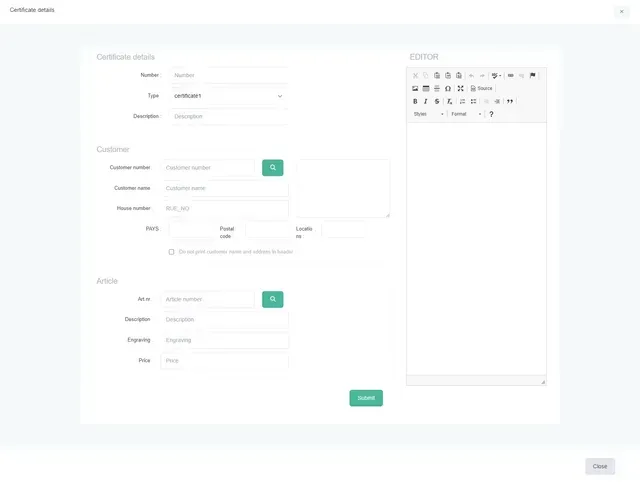
First we create the layout/design of the certificate-detail page, since we are going to use the same page for the creation of a certificate, inside the page we will have a form and a text editor, within the text editor we will be able to see how the form is filled.
So we have to import the text editor in the shared module file:
import {CKEditorModule} from 'ckeditor4-angular';
@NgModule({
declarations: [
...
],
imports: [
...
CKEditorModule,
...
],
exports: [
...
],
providers: [
...
],
})
and use it in the certificate-detail.html file like this:
<ckeditor id="ckeditor" [data]="formContent" [config]="config" ></ckeditor>
In the data property we passed the formContent which references the form data to be displayed in the text editor, and to the config property we are passing a config setting, to change the layout/style of the editor; this is not necessary, without that property we would have the default layout/style of the text editor. In our case we only changed the height of it, as follows:
FILE: webpack.config.js (REMOTE)
config: any = { height: 650 }
So our page will look like this...
And now we have our microfrontends project!
So we need to implement it into our retailgear-app-main-v1. We need to add Module Federation in our project first, read “How to use your microfrontends in the retailgear-app-main-v1.”.
After adding the Module Federation in our project, we need to modify the generated webpack.config.js file, by exposing our module, like so:
new ModuleFederationPlugin({
// For remotes (please adjust)
name: "certificates",
filename: "certificates.js",
exposes: {
'./CertificateModule': './src/app/certificate/certificate.module.ts',
},
shared: share(sharedLibrary)
})
Next we have to integrate it in the retailgear-app-main-v1, first we need to check on which port is the microfrontend running, for example in our case it is using port: 4201, then we need to add the following code in the “remotes” part of webpack.config.file, of the retailgear-app-main-v1:
'certificates':'http://localhost:4201/certificates.js'
Now, we can use our microfrontends project in the retailgear-app-main-v1, since we don’t want to use it as a component, we use the URL routing method, read section: “How to use your microfrontends.”.
We want to use that microfrontend within our business component, so we have to add the below code in the business-routing.module.ts file:
…{
path: 'jewels-and-watches', loadChildren: () =>
import('certificates/CertificateModule').then(
module => module.CertificateModule
),
data: { title: 'JEWEL_AND_WATCHES' },
canActivate: [AuthGuard, ModalOpenGuard]
}…
We will get an error from typescript. To solve that, we need to add the following line of code inside the dummy declaration file (decl.d.ts file), that you can find in the same folder of the business-routing file.
…
declare module 'certificates/CertificateModule';
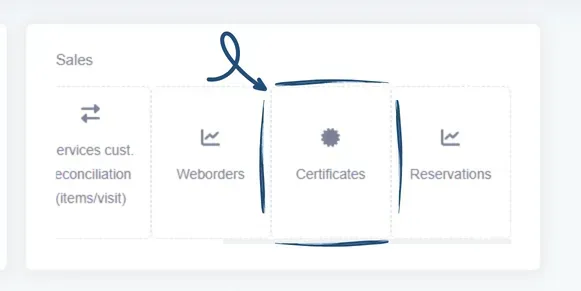
And finally we can create a button to call our microfrontends. In our case we are going to implement that into the ‘SALES’ section of the dashboard of the retailgear-app-main-v1 with the following code:
FILE: app/business/dashboard/dashboard.component.html file
<app-button-dashboard link="/business/jewels-and-watches" icon="certificate" title="JEWEL_AND_WATCHES [loading]="currentUrl=='/business/jewels-and-watches'"> </app-button-dashboard>
Add the above code in the dashboard.component.html file of the retailgear-app-main-v1.
Finally, by pressing such button we should be able to view and use our certificates microfrontend project!
Set up
- How to download retailgear’s frontend repositories.
- How to run the platform on your machine.
- How to use your purchased backend.
- How to create your own microfrontends.
- Microfrontend project example: Jewels and watches (Angular).
- How to create your own micro services.
- Deploy your application, basic steps.
Cash register