How to create your own micro services
We will explain how to create your own micro services through an example, keep in mind that you are free to use any other technology. Since we will use “PrismaNote Jewels and Watches (Micro-service)” as an example, for this particular backend micro service we need to use:
- NodeJS (16.10.0). You can download the .msi NodeJs from this link (https://nodejs.org/dist/v16.10.0/)
- MongoDB shell (v5.0.14). Follow this link for the download & installation (How to Download & Install MongoDB on Windows | by London App Brewery | Medium ).
Make sure that Node and NPM are installed and their PATHS defined. As you installed the NodeJS, you can make sure that Node is installed properly by running the following command in a terminal: node -v, which should return a version number: v16.10.0; also make sure to choose and download the v5.0.14 version of MongoDB shell.
After the configuration and installation process, create a folder and name it whatever you want, in our case we are going to name it
prismanote-jewel-and-watches-services. Within that folder
you can add your custom logic, so develop what you need! We will just briefly explain what our folder contains:
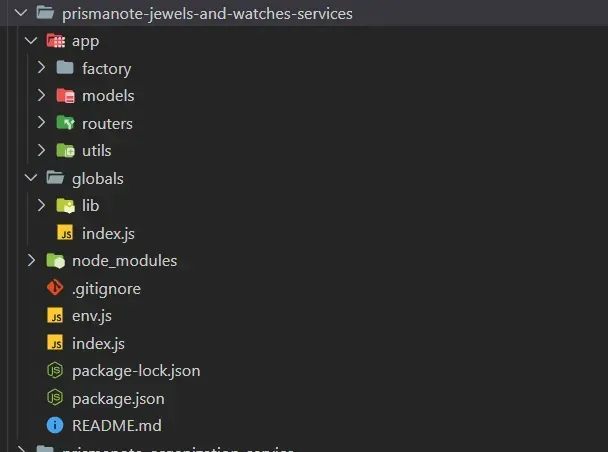
- app - contains the factory, models, routers and utils folder where we write our application logic and do execution of it.
- factory - contains authentication configuration, database connection and configuration and exceeds limit configuration.
- models - contains Certificate schema which we used to store data in the database.
- routers - contains controller and logic of the application where we will do CRUD operation (CREAT, READ, UPDATE, DELETE) and similar operation.
- globals - contains common reusable functions and scripts which we can use throughout the project.
- index.js - is an entry point of the application.
- env.js - is the configuration file of the node-environment.
- package.json - is used to record important metadata about a project which defines functional attributes of a project, that npm uses to install dependencies, run scripts, and identify the entry point to our package.
- For authentication we are using the json-web-token,
jsonwebtoken - npm, also for external developers we are using the accessKey which will be created by Admin.
How to use your micro service
After the creation of our micro service, the next step is to use it. To do this we simply need to configure it into the micro frontend project, where we want to use it. You can configure it any way you want.
In our case we want to use the jewels-and-watches micro service inside the jewels-and-watches microfrontend project, so we need to set our micro service in both environment files of our microfrontend, like so:
FILE: environment.ts
export const environment = {
production: false,
…
JEWELS_AND_WATCHES_URL :'http://localhost:3009',
…
};
FILE: environment.prod.ts
export const environment = {
production: true,
…
JEWELS_AND_WATCHES_URL :'http://localhost:3009',
…
};
So whenever we need to do an operation we can just simply call “environment.JEWELS_AND_WATCHES_URL” to have our base url of our microservice, to facilitate such operations we use apiService, which you can find in your main application folder, specifically by following this path: …\src\app\shared\service\api.service.ts.
You can copy and use such file for your API calls.
If you are going to use our apiService you will need to put your environment.SOME_URL inside the getApiBaseUrl(ApiType) function, and give it a ApiType (add that apiType in the type alias ApiType).
Notice that you are free to use any method to call your API.
For instance we need to call the get-organization API inside a function, which is located inside our app component, so the app.component.ts file will contain something like this:
import { ApiService } from './shared/service';
...
...
constructor(
....
private apiService: ApiService,
...
) { }
...
someFunction(){
this.apiService.getNew('organization', '/api/v1/public/get-organization').subscribe((result: any) => {
...
}
}
The getNew method, of the apiService, takes the first parameter to figure out the url base to be used, and it use the second parameter to complete the URL, after obteing the complete URL it then do the call. If the environment.ORGANIZATION_URL is localhost:4200 the complete URL will be: localhost:4200/api/v1/public/get-organization.
The apiService will be like:
import { environment } from '../../../environments/environment';
type ApiTypes = ...| 'organization' | ...
export class ApiService{
...
getApiBaseUrl(apiType: ApiTypes): any {
switch (apiType) {
...
case 'organization':
return environment.ORGANIZATION_URL;
...
}
}
...
}
Set up
- How to download retailgear’s frontend repositories.
- How to run the platform on your machine.
- How to use your purchased backend.
- How to create your own microfrontends.
- Microfrontend project example: Jewels and watches (Angular).
- How to create your own micro services.
- Deploy your application, basic steps.
Cash register